

A brief introduction to GLSL that should prepare you to start writing shaders. If you find something missing or incorrect, please point it out in the comments so we can fix the article.
(This is a revived old article from NOMone’s old website that only exists on the Wayback Machine now).
Overview
A shader is a program that run on the GPU (Graphics Processing Unit, or lets say, your graphics card). Since GPU programs are quite different from CPU programs, it’s necessary to have a little comparison between the two.
General purpose vs Special Purpose
CPUs are general purpose. They don’t make assumptions about the nature of the program being run. Therefore, their design optimizations are the most general optimizations that would work on any program. However, most CPUs have special purpose instruction sets that serve multimedia applications (like MMX, SSE, 3DNOW, NEON …etc), but they are still used within the general purpose framework. CPUs also carry lots of burdens other than running programs. Stuff like memory paging and protection, context switching, code privileges, interrupt handling and lots of other stuff.
GPUs are special purpose. They are mainly used for rendering graphics to the screen. They are heavily optimized to do this task efficiently. However, they are flexible enough to be used in other applications as well, so they can be used for general purpose programming to some extent. For more details, search for GPGPU.
Sequential vs Parallel
CPUs are sequential in essence. CPUs “appear” to run instructions in the order they are written in the program, one at a time. In this sense, CPUs are SISD (Single Instruction Single Data). Each instruction performs its operation on only one piece of data (except multimedia extensions). When the CPU is multi-core, it becomes MIMD (Multiple Instructions Multiple Data), or more accurately SMP (Symmetric Multi-Processing, because they still share the same resources). Different cores are allowed to run different programs independent of each other. However, cores are usually limited in number and they fight over the system resources, most of which can’t be accessed in parallel. They have to wait for each other from time to time. Yet, CPU cores are powerful. They operate at high clock rates and are quite capable themselves. For instance, an Intel core-i7 processor has 4 cores, each one capable of running two threads at the same time, with each thread capable of performing 8 similar floating point operations at the same time (multimedia extensions). That of course, provided that the software running makes full use of the processor’s parallel abilities.
GPUs are parallel. They have exponentially larger number of cores than most CPUs. For instance, nVidia GTX TITAN Black GPU has 2880 cores (can do 2880 floating point operations in a single cycle). However, these cores are not as flexible or as powerful as CPU cores. They are SIMD (Single Instruction Mulitple Data), meaning that, they can’t run different programs at the same time. They have to run exactly the same program, exactly the same instruction at any single clock cycle. This is not entirely true, but it gives you the general idea. In reality, these cores are allocated in batches (warps) and each batch can run a different program. The maximum amount of programs that can be run in parallel differs from one graphics card to the other.
So every line of code in the shaders you are going to write is going to be run be many cores at the same time on different data thousands or millions of times with each frame.
Now lets get to the shaders!
Shader pipeline
From now on, we’ll be talking about OpenGL shaders only, which are very similar to DirectX shaders.
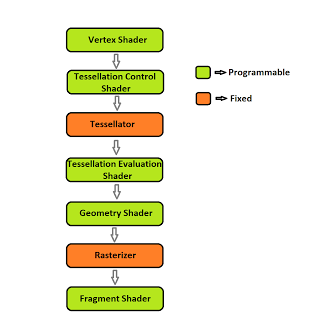 Original image taken from here.
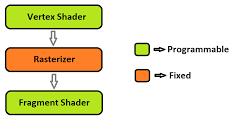
That’s OpenGL 4.0 shader pipeline. For now, we don’t have to understand this long pipeline. We can get away with just understanding vertex and fragment shaders. If you are a web or mobile developer, then WebGL 1.0 and Opengl ES 3.1 (HTML5 and mobile) don’t have tessellation and geometry shaders at all. In fact, according to this, as of December 2015 most android devices are still stuck with OpenGL ES 2.0. There are ways to overcome OpenGL ES 3.1 limitations to provide desktop like graphics, but this article is about OpenGL, so no fancy extensions, Metal, Vulcan or Android Extension Pack stuff!
For javascript and most mobile developers, this is how the pipeline looks like:
Now lets get to it. This is how it goes. You have a 3D model that consists of:
- A group of vertices.
- A group of primitives (points, lines and triangles. Desktop Opengl also has quads and polygons) defined by the vertices.
- Other user-defined data, like colors, normals, textures or whatever you need to draw your model.
All the above data are uploaded to the GPU from your regular CPU program (your game, for example). A GPU program can’t live on its own. It has to co-exist with a CPU program that controls it and sends it appropriate data. These data are fed into the pipeline in the above picture from the top. It’s over-simplified, but that’s all you need to know about now. So the first stage is the vertex shader.
Vertex shader
|
1 2 3 4 5 6 7 8 9 10 11 12 13 14 |
attribute vec4 position; uniform vec4 globalColorMask; varying vec4 pixelColorMask; void main() { vec4 colorMask; colorMask.x = (position.x + 1.0) / 2.0; colorMask.yzw = vec3(1.0, 1.0, 1.0); pixelColorMask = colorMask * globalColorMask; gl_Position = position; } |
Yep, that was a vertex shader! It’s written in GLSL (OpenGL Shading Language). In the shader pipeline, the vertex shaders is run once for each vertex. The calculations that should be done per vertex should be done here. Stuff like vertex transformation, vertex animation and basic shading can be done in the vertex shader. This very simple shader does nothing to the input vertices except associating a user-defined color with them, and makes it darker at the left side of the viewport and brighter at the right side.
Take a good look at it then continue reading. You should notice the following about GLSL:
- It has C-like syntax.
- Three type modifiers are used,
- attribute. Passed from the CPU program together with each vertex data (i.e: per vertex). In this shader, the only attribute defined is the vertex position.
- uniform. Passed from the CPU program every once in a while. Unlike attributes, this type of data doesn’t change per vertex. It’s up to the programmer to decide when to change them (between drawing calls). Once a batch of primitives is queued to be drawn, all of them have their uniforms set to the last values set just before the drawing call. In this program, the only uniform specified is a global color mask that should be applied to all vertices.
- varying. These are not passed to the shader, they are generated by the shader to be inputs to the rasterizer. Lets say, we are drawing lines. Each line is defined by two vertices. After being processed by the vertex shader, each one will be associated a value to this varying. The line is then rastarized into pixels. Each pixel will have a value assigned to this varying that is equal to the interpolation of its values at the adjacent vertices based on distance. Thus, varyings gradually change their values as we move from one vertex to the other on the primitive’s surface. In this program, pixelColorMask is supposed to be the final vertex color. When interpolated across vertices it should give a nice gradient.
- Vector types are part of the language specification. Matrix types are supported as well.
- main() is the program entry point. This is called for every vertex.
- You can define local variables.
- Vector components can be accessed individually as (x, y, z, w) or (r, g, b, a) or (s, t, p, q).
- Floats DON’T have and tailing “f”.
- There is no automatic type promotion, types have to be specified explicitly. There is no casting as well, but there are conversion constructors. It’s illegal to write “float a = 1;” because 1 is an integer. To do it, you have to write “float a = float(1);”.
- You can “swizzle” and replicate vector components. It’s legal to write “vector1.xyzw = vector2.yxxz;”.
- “gl_Position” was not defined. It’s implicitly defined and is an input to the rasterizer. Without it nothing shall be drawn.
So this shader takes a color mask and interpolates it from dark to bright from left to right. The positions of the vertices are assumed to be normalized, where (-1.0, -1.0) stands for the bottom-left corner of the viewport and (1.0, 1.0) stands for the upper-right corner of the screen.
Rasterizer
Next in the pipeline is the rasterizer. Its job is to turn primitives into pixels and interpolate the outputs of the vertex shader from the primitive’s vertices to every pixel on the primitive based on distance.
Fragment shader:
|
1 2 3 4 5 6 7 8 |
precision highp float; varying vec4 pixelColorMask; void main() { gl_FragColor = pixelColorMask; } |
That’s it. It’s very simple, just passing through the interpolated value of the varying specified by the vertex shader. Fragment shaders:
- are called AT LEAST once per pixel. The output from a fragment shader is the final pixel color (and the final pixel depth if specified).
- must have the floating point precision specified (in OpenGL ES). Values are highp, mediump and lowp. You can override this per variable.
- don’t support attributes. Attributes are per vertex, not per fragment.
- have to redeclare the varying(s) of the vertex shader before using them.
- are probably the bottle-neck of your shader program. They are called thousands or millions of times every frame, depending on the scene complexity. The slightest optimization in the fragment shader leads to large overall performance improvement. If something can be moved from the fragment shader and implemented in the vertex shader instead, that’s usually a huge optimization.
And here are our shaders in action: http://goo.gl/BS3VZw
Note that the website allows modifying the shader code only, not the CPU code. Thus given its interface, we can’t control the uniforms or the attributes. So in order for this shader to work, we have to work our way from the provided unnormalized vertex positions and turn our only uniform into a constant. The vertex shader was modified to take care of these issues. I chose this website because it allows modifying the vertex shader. If all you want is to write a fragment shader that doesn’t depend on a specific vertex shader, try this one: http://glslsandbox.com. For a community of really awesome shader developers, follow http://shadertoy.com.
For more “quick” info about GLSL (of OpenGL ES 2.0, which is the most widely supported mobile OpenGL and is equivalent to WebGL 1.0), this pdf is your best friend: http://www.khronos.org/opengles/sdk/docs/reference_cards/OpenGL-ES-2_0-Reference-card.pdf
Thanks for reading, I hope you enjoyed it. Please leave your comments 🙂